One of my favorite things to do every single year is make a birthday cake for my son! It’s a tradition that started long ago in my family when my parents baked and designed mine and my sister’s birthday cakes.
I don’t have a lot of practice other than the one cake decorating class I took at Michaels and just helping and observing my parents over the years growing up! Still, I love to challenge myself and up the ante every year! This past October, I made my son a Spider-man cake. I researched different Spider-man cake ideas on Pinterest and saw a few different styles I liked and decided to combine my favorites. I was crazy ambitious and even sketched my plans beforehand. Honestly, after I sketched it, I was anxiously counting the weeks until I could make this cake. 50% anxious over if I could actually make it and 50% anxious to see the final product!

Working with gluten-free cake batter is always a fun one, as it’s much more prone to crumbling. However, I took the lessons I learned from my one cake decorating class and it mostly paid off, with the help of my husband. I baked the cakes a day before and double wrapped them in saran-wrap and tinfoil, before placing them in the freezer overnight.
The following day, I took the cakes out and waited as patiently as I could for them to defrost. I like to put fillings inside my cakes because gluten free cakes tend to come out drier so I had to let them defrost enough to slice them. I was a little impatient and ran into some hiccups because of it, but my husband helped me slice through the cakes and stuffed some cake underneath in the spots where it was uneven to fill it out. It was all going to be covered with frosting anyways so who would know the difference? After slicing the cakes, I created a frosting border around the inside rim and filled the rest with the cinnamon apple filling my husband had cooked up (being married to a chef really has its perks!). Afterwards, I placed the layer back on top. Once it was together, I covered it with the crumb coat and placed it in the refrigerator for 15 minutes, while I proceeded to do the same steps with the next level of the cake.
Now, onto the decorating!
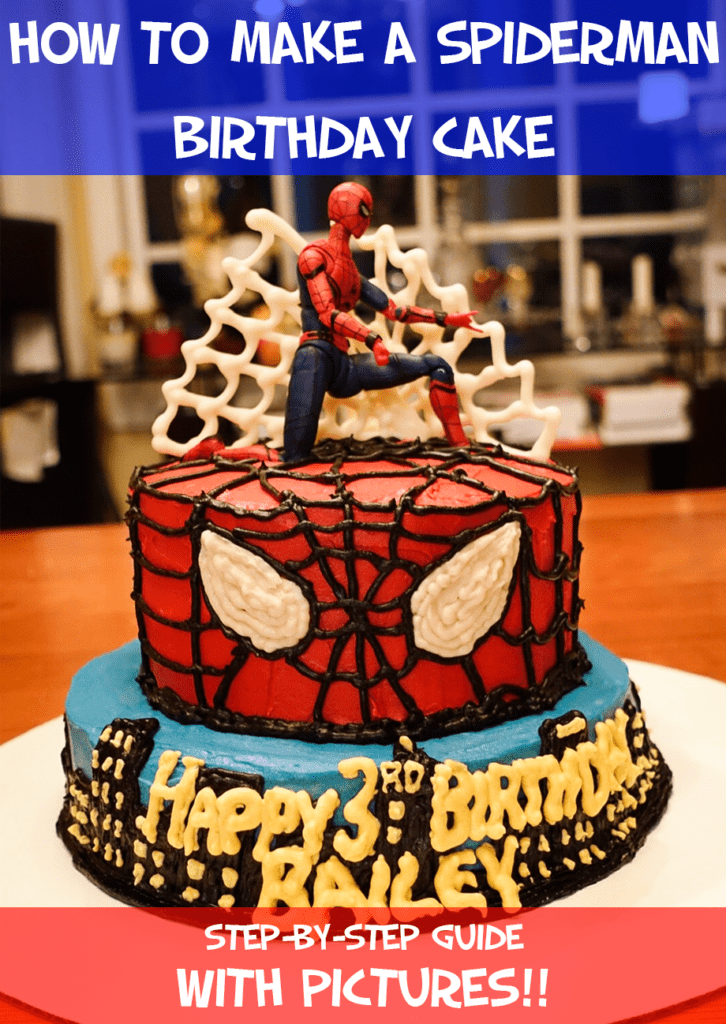
Let me start by saying making red frosting is probably the biggest pain in the world. I poured an entire container practically of red food coloring in and it still was turning into a light pink. After an hour of melting down from this experience, I called my husband. He stopped at the store, picked up some store bought red frosting, and brought it home. He squeezed in a small amount and voila! Red. After taking the top level out of the refrigerator, I coated it with the red frosting. I then squeeze black frosting along to make the web and an outline for Spidey’s eyes.

The next step was filling in the eyes with white frosting.

The bottom cake, I covered with a layer of blue frosting. I then used the cake lifter to lift the top level onto the bottom level cake. Afterwards, I used the black frosting to create the city buildings. I used a slightly larger frosting tip for the buildings but I still kept it fairly small to avoid any large blotches!

The final step (with frosting) was writing the letters and making the little square lights on the skyline with yellow frosting! Before dotting the windows in, I wrote out “Happy 3rd Birthday Bailey”. It came out a little small originally and I had to retrace it with a larger tip for the piping bag.

I spent the morning making the frostings and preparing the cakes, and the afternoon decorating the cake while my son was napping! In the end, once all of the frostings were made, the decorating itself took about three hours to complete.
I put the cake in the fridge the second I could hear my son coming down the stairs and let the frosting harden. After he went to bed that night, I created the final piece: the white chocolate webs for the top! This was surprisingly easy. I got a bag of white chocolates specifically for melting, melted them in the microwave for the designated time on the bag, and poured it into the piping bag. On a baking tray, I spread out a sheet of wax paper and drew the shape of the web with the chocolate. I made a few extra in case they would break! Afterwards, I placed them in the fridge and within 15 minutes they were hard and ready to be placed on the cake. I made them thick enough that I didn’t have any problems with them breaking when I gently pressed them into the top of the cake.

While my original drawing also included webs that I was planning to have come out along the side of the cake (I was thinking of using melted marshmallow…), I decided to stop while I was ahead and let this be the final product. For the topper, I bought a fully posable Marvel Retro 6-inch Collection Spider-Man Figure that also works as a great toy for my son now! For a less expensive version, I found this Spider-Man Marvel Legends Series Far from Home 6″ Collectible Figure available on Amazon, as well.

In the end, the cake was a huge success and my son LOVED it. Of course, I’m pretty sure for him at three, I could’ve just frosted it red and put Spider-man on top and he would’ve loved it just the same. Regardless, the decorating was really for me. I love doing it and right now I only get to do it once a year so I go all out! And on that note, I leave you with the aftermath of the cake…