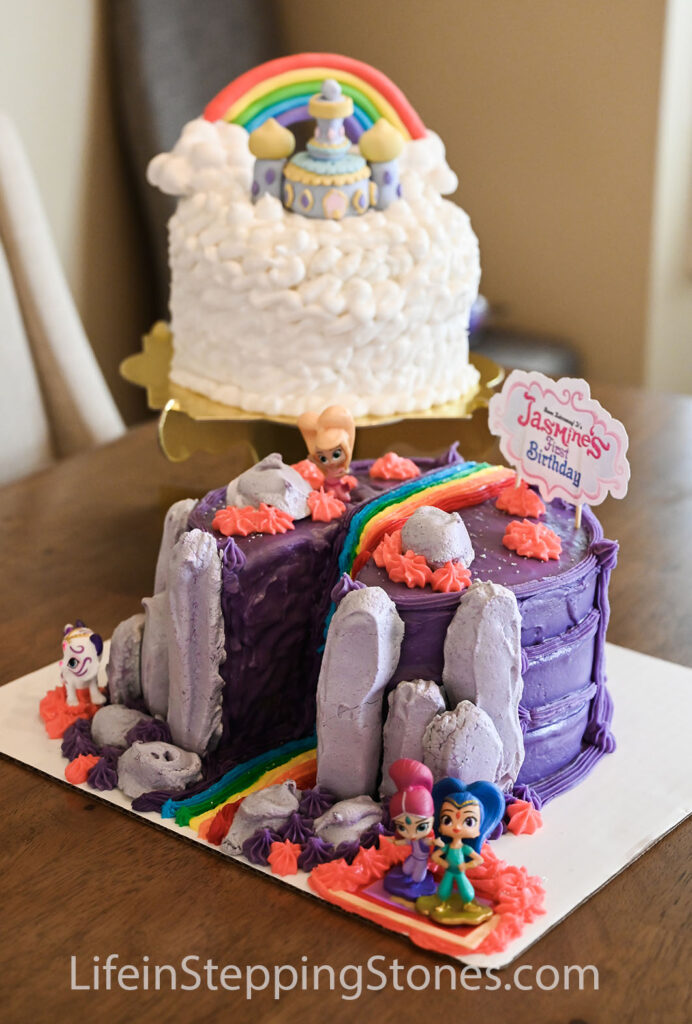
My daughter may only be one, but she is an avid Shimmer and Shine super fan. We’re talking full on dancing, attempts to sing along, and hand gestures to let us know she wants to watch it. It was an easy decision to make her first birthday a Shimmer and Shine theme and make her a Shimmer and Shine Birthday Cake! Actually, in the end I made two cakes – a cloud smash cake and a Rainbow Zahramay Falls birthday cake.
When I bake a birthday cake, I use the King Arthur Gluten Free Yellow Cake Mix, which is my absolute favorite brand for baking cakes.
I completely messed up the first cakes though. My exhausted mom brain remembered my son’s cakes sometimes not rising as much, so I thought, “hey, I could just double the recipe and put it in this one cake pan.” Needless to say it practically turned into an I Love Lucy episode in my oven. So note to everyone who’s not as silly as me, don’t ever double up in the same pan. It will not go well.
Gluten Free and Dairy Free Cake Recipe
To bake the cake, follow the recipe on the boxes for King Arthur cake mix, substituting the dairy if you’re dairy free like me. For this cake, I made three cake recipes. One for the smash cake, and two for the main cake.
- 1 Box of King Arthur Gluten Free Yellow Cake Mix
- 1/2 cup Earth Balance Soy Free Butter, softened
- 2 tbsp vegetable oil
- 2/3 cup of Ripple Vanilla Pea Milk
- 4 large eggs
After the previous incident with the cakes exploding everywhere, we decided to bake the cakes in multiple layers (as the recipe says…imagine that?!). Two layers for the smash cake, and four layers for the main cake. We baked each layer for about 25-30 minutes, as recommended on the box. I recommend putting your oven on the time listed on the box and then checking from there. My oven tends to be pretty slow!
Dairy Free Frosting Recipe
I love making my own frosting every year too.
This is my dairy free frosting recipe:
- 3 cups powdered sugar
- 1/3 cup Earth Balance Soy Free Butter, softened
- 1 1/2 tsp vanilla
- 1-2 tbsp Ripple Vanilla Pea Milk (I use the small lunchbox size containers that don’t need to be refrigerated for baking)
- Liquid food coloring (I love this brand of Gourmet Food Coloring Liquid)
Mix the ingredients together and add milk for thinner consistency and add powdered sugar for firmer consistency.
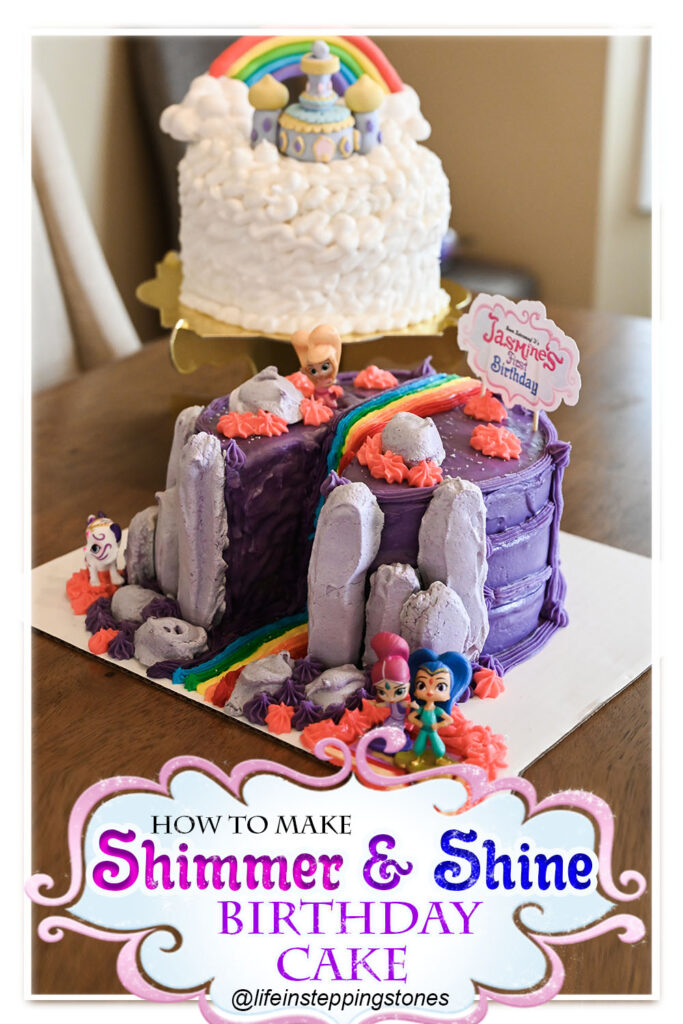
Designing a Shimmer and Shine Birthday Cake
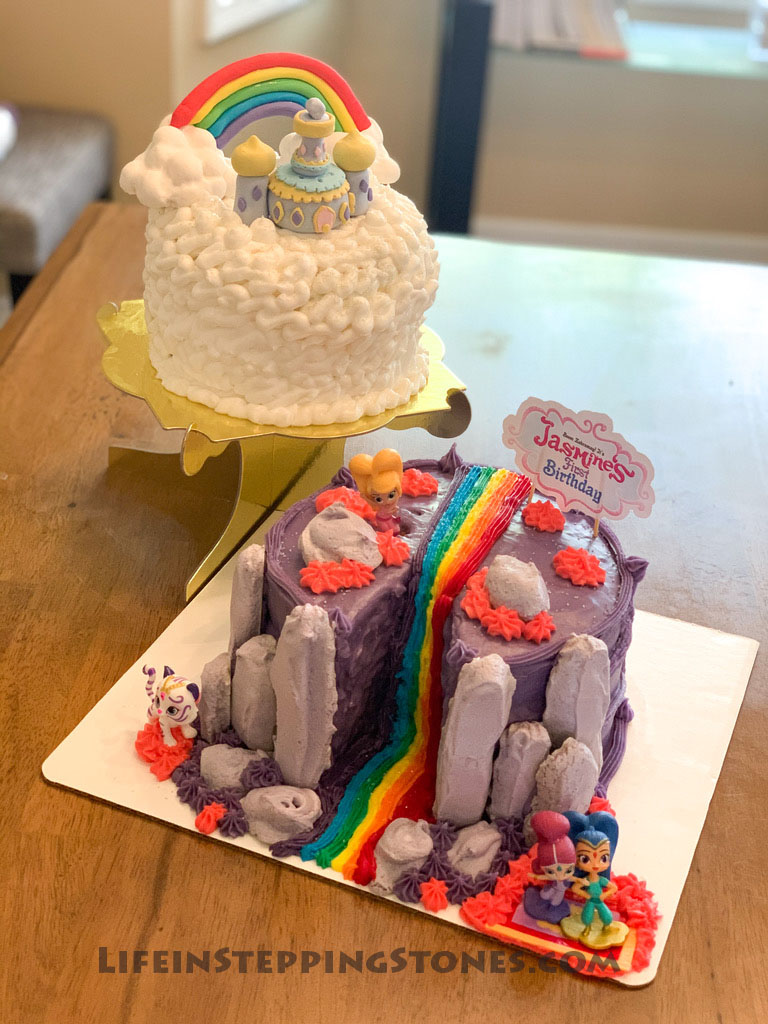
Because it was her first birthday, I made both the main cake and a smash cake!
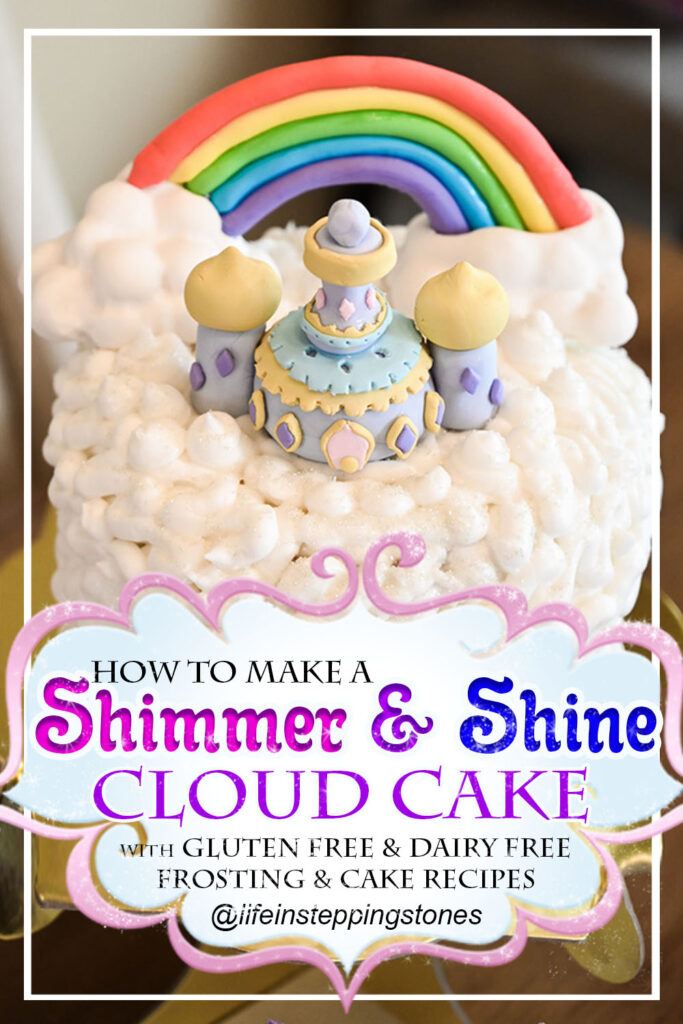
How to Make a Shimmer and Shine Birthday Smash Cake
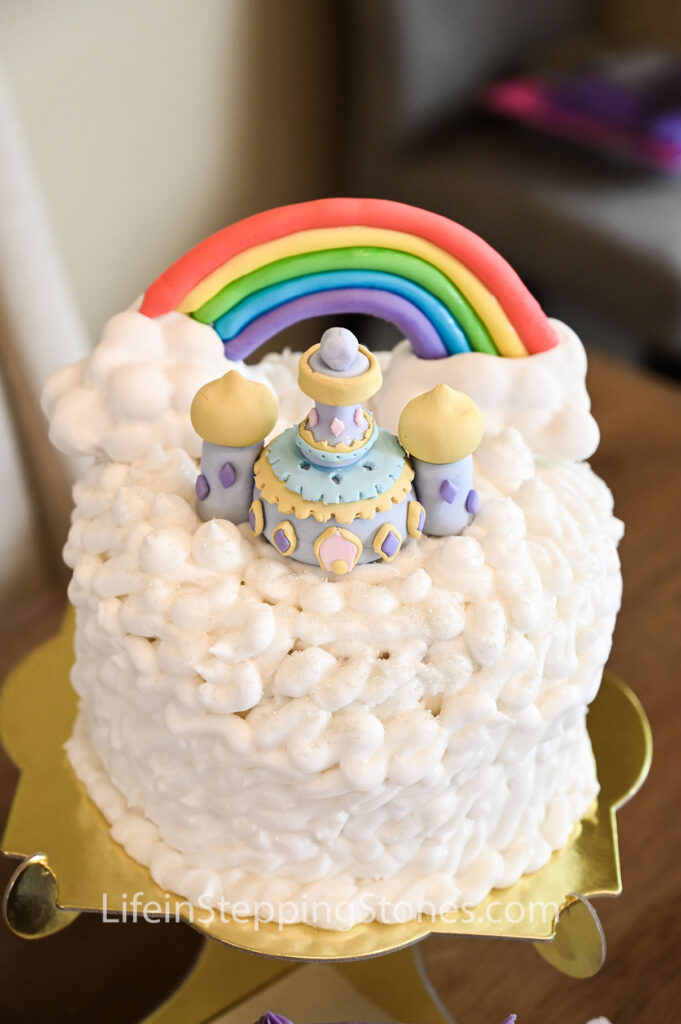
For the smash cake, I created custom figures out of gum paste (instructions here).
Besides making the figures, all you need for the smash cake is:
- white frosting
- round frosting tip
The smash cake is comprised of two layers of cake, stacked together.
After applying a white crumb coat, decorate it with white swirls using the round frosting tip to represent clouds. It helps to have the cake on cake turntable so you can easily continue your swirls around the entire cake.
How to Make the Main Shimmer and Shine Birthday Cake
In addition to the frosting and cake mix above, to make the main cake you need:
- Shimmer and Shine Cake Topper Toys
- Glue Dots
- Wilton Star Frosting Tip
- Silver Sprinkles
- Ingredients to make meringues (recipe below)
Meringue Recipe for Cliffs
To make the cliffs that surround Zarahmay Falls, we made meringues to give it the desired effect.
Making meringues is actually really simple! To make them, you need the following ingredients:
- 2 egg whites
- 1/2 cup sugar
- 1 tbsp clear vanilla extract
- purple food coloring
- Whisk egg whites on high until the egg whites form soft peaks.
- Gradually add sugar. Add 1/4 cup and whisk. After whisking, add another 1/4 cup, and whisk again.
- Add purple food coloring
- Whisk until its not runny. You’ll know its not too runny if you put it on the tray and it stays fairly formed to its shape.
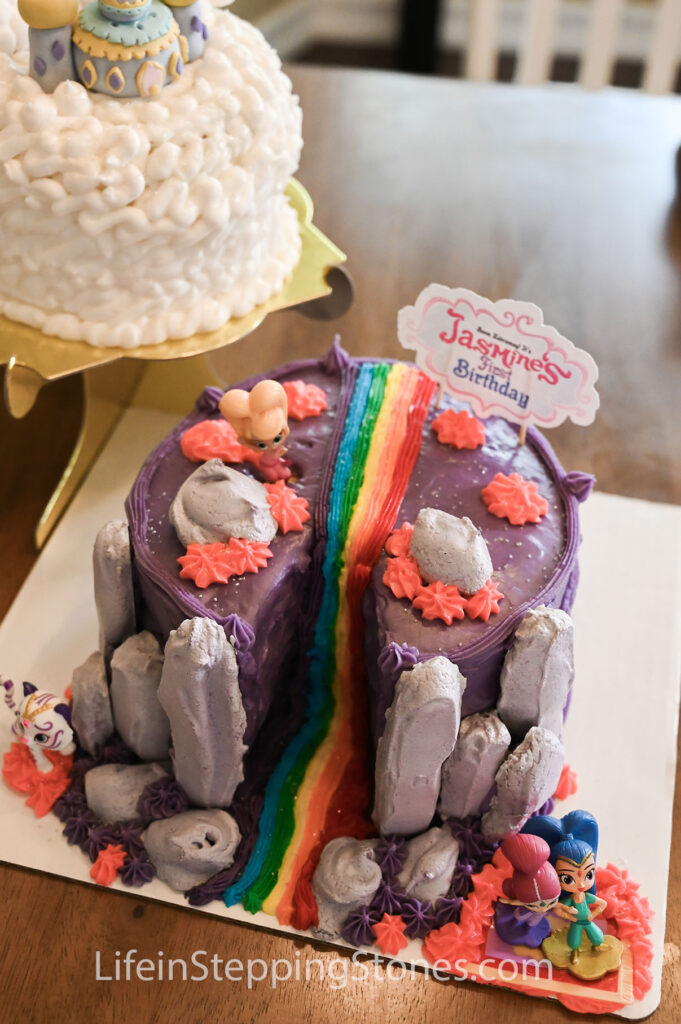
- Place the meringues on the tray, in eight rectangular shapes. Vary the heights to give interest (as shown in the picture). Make six round shapes as well, for shorter rocks to place in front and on top.
- Bake at 269F for 1 hour.
Preparing the Cake
Anytime I bake a cake for a party, I bake it the day before (or sometimes a few days before), and freeze it. When freezing a cake, wrap it tightly in Saran Wrap, and then with tin foil.
I always prefer to level the cake after it’s been frozen and has thawed a bit. Alternatively, you can level it beforehand if that is your personal preference.
Once the layers are leveled, dab a dot of frosting on the bottom of the cake board and then place the bottom layer on top. Apply frosting around the edges of the top of the bottom layer, then place the second layer on top. This will help the layers stay in place.
Once the layers are placed together, cut out a piece of the cake, angled triangular, but instead of a point at the end, leave enough of a gap for all of the colors of the rainbow to be frosted on (about an inch or an inch and a half).
Applying the Crumb Coat
For the base layer, I colored the frosting purple with food coloring. The crumb coat layer of frosting should be a thinner consistency than the rest of the frosting you’ll be using. To thin it, add a tbsp at a time of milk until you have your desired consistency.
While a crumb coat is normally recommended, my cake was frozen enough still that I wasn’t encountering much crumbs, and therefore didn’t need to do a second layer on top of most of it, with the exception of the inside gap that I had cut out.
For the inner gap, I covered it with frosting, smoothed it over, placed the cake in the refrigerator, let it harden, and then applied another layer of frosting.
Frosting the Shimmer and Shine Cake
For this cake, you’ll need to make quite a few different colors of frosting!
Frosting Colors You’ll Need:
- Light Purple Frosting (for the crumb coat, as mentioned above)
- Dark Purple Frosting (for the trim, rainbow, and bushes)
- Pink Frosting (for the bushes)
- Red, Yellow, Orange, Green, and Blue Frosting (for the rainbow)
Once the base coat has hardened from being in the refrigerator (I normally put it in for 10-15 minutes while I work on coloring the frosting), take the cake out and begin decorating!
I began with the dark purple trimming, lining it around the top, the bottom, and in two strips around the middle of the cake. After the trimming was all complete, I placed the meringues on the sides, top, and front of the cake. To make them stick, I put frosting underneath and gently pressed them to the surface. After the meringues were in place, I added the purple bushes around the bottom meringues.
Next, I made a line of the rainbow, starting from the back of the top of the cake, and going down the gap and across the cake board to make the waterfall. I then continued with each color until the rainbow was complete.
Finally, I used the star tip with the pink frosting to make the remaining bushes on top and on the side. I also used it to help some of the figures stick to the cake.
Final Touches
Before adding the figures to the cake, I used glue dots to stick Shimmer and Shine to their magic carpet. I then placed my daughter’s favorite characters on the cake.
Finally, I sprinkled silver sprinkles across the top and the rainbow to give the cake a sparkle!
This cake wasn’t really designed with the concept of writing “Happy Birthday” across the top in frosting, so instead, I was very excited to use my Cricut (this was the first party I threw since owning it!).
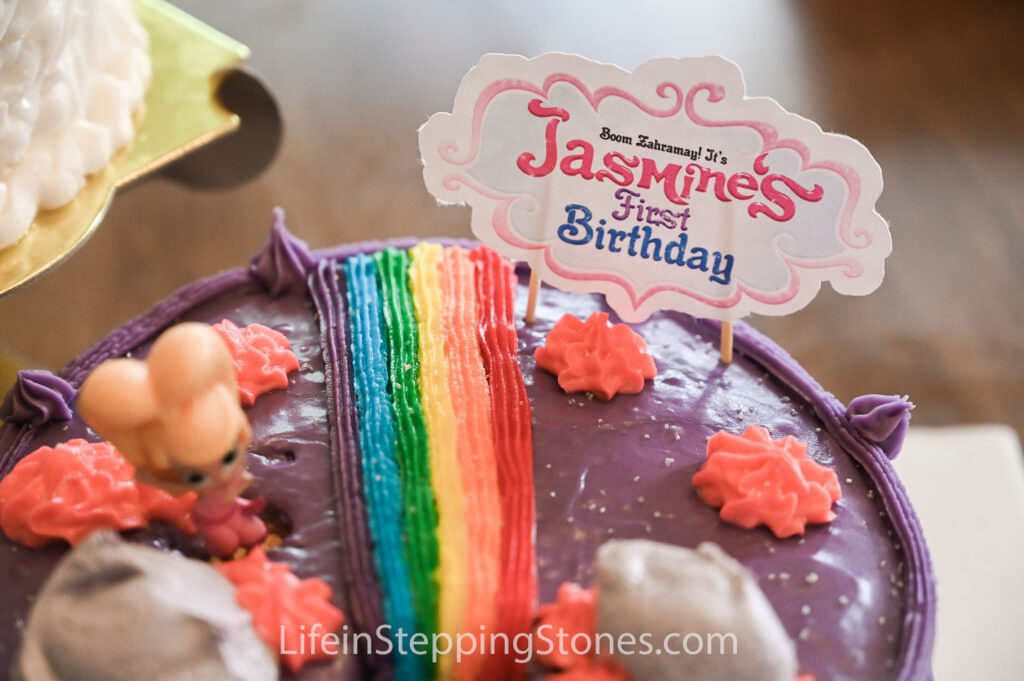
I designed the Happy Birthday Shimmer and Shine logo (email me at Justine@LifeinSteppingStones.com if you are interested in having a personalized logo designed for your kid’s birthday invitations, banners, etc). I used the Print and Cut option on the Cricut, printed it to 110 lb paper, and once it was printed out, glued it to two toothpicks to have it stand on the cake.
While my daughter was too young to truly appreciate the cake, my son (who is also a huge Shimmer and Shine fan) was over the moon. My dainty daughter refused to get herself dirty with the smash cake and instead taste tested with one finger…my son on the other hand, tried his hardest to show her how she was supposed to smash her face into it!
The gum paste figures from the smash cake are now displayed proudly in my daughter’s bedroom, and already at one and a half, she points them out to me with excitement. My son still looks back at pictures of his cakes from birthdays he doesn’t remember and talks about them. I know she’ll do the same one day with this cake.